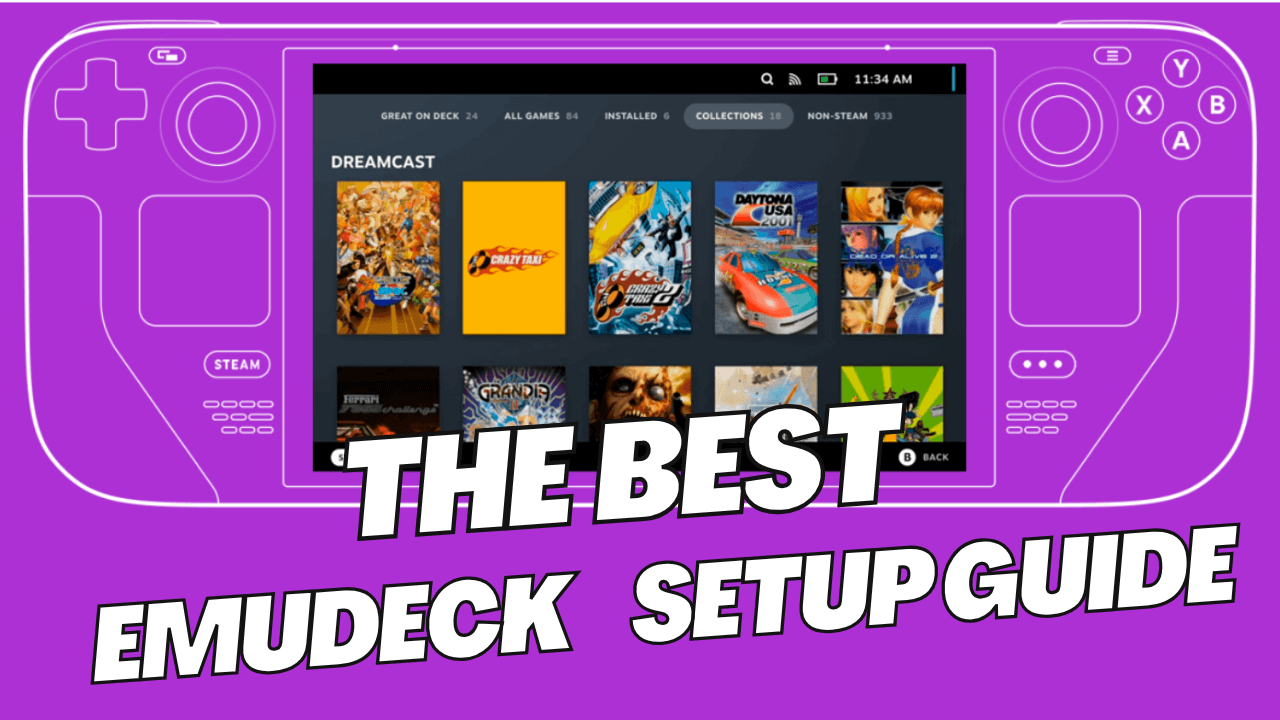
If you’re looking to transform your Steam Deck into a retro gaming powerhouse, EmuDeck for Steam Deck is your best solution. With its seamless integration, automatic configuration, and support for a wide range of classic consoles, EmuDeck makes playing your favorite retro titles easier than ever.
In this updated 2026 guide, we’ll walk you through every step—from installation to system configuration and gameplay optimization. Whether you’re new to emulation or revisiting it, this tutorial brings a fresh, efficient way to get started.
Why Choose EmuDeck for Steam Deck?
EmuDeck for Steam Deck is more than just a collection of emulators—it’s an ecosystem built to feel native to SteamOS. It allows you to:
Enable features like retro achievements, bezels, shaders, and auto-save/load
Automatically install and configure dozens of emulators
Integrate retro titles into your Steam library
Use a controller out of the box with no complex setup
Step 1: Prep Your Storage
Before using EmuDeck, decide where your ROMs and BIOS files will live. Most users either use:
- The internal SSD for speed and simplicity
- A microSD card (U3-rated, A2 class recommended) for expanded capacity
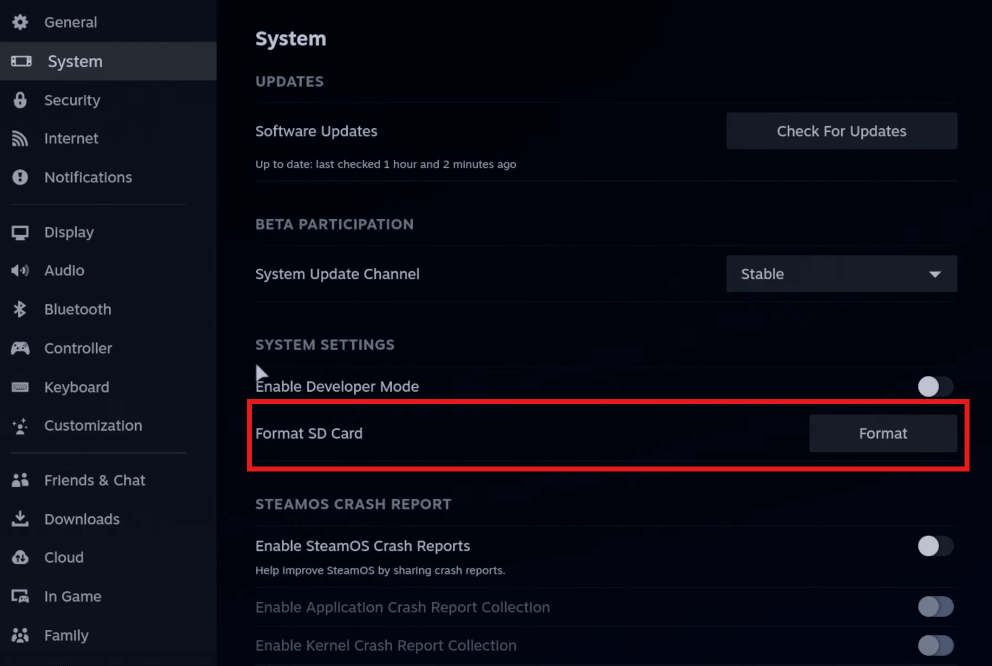
To format your SD card:
1. Insert the card into your pc handheld steam.
2. Open Settings > System.
3. Scroll to Format SD Card and press Format (this will erase all data).
Step 2: Switch to Desktop Mode
To begin the installation, you must leave the standard gaming interface. Press the Steam Button, navigate to Power, and select Switch to Desktop.
Pro Tip: Using an external wireless Bluetooth mouse and keyboard is highly recommended; navigating the Linux desktop with trackpads can be fiddly.
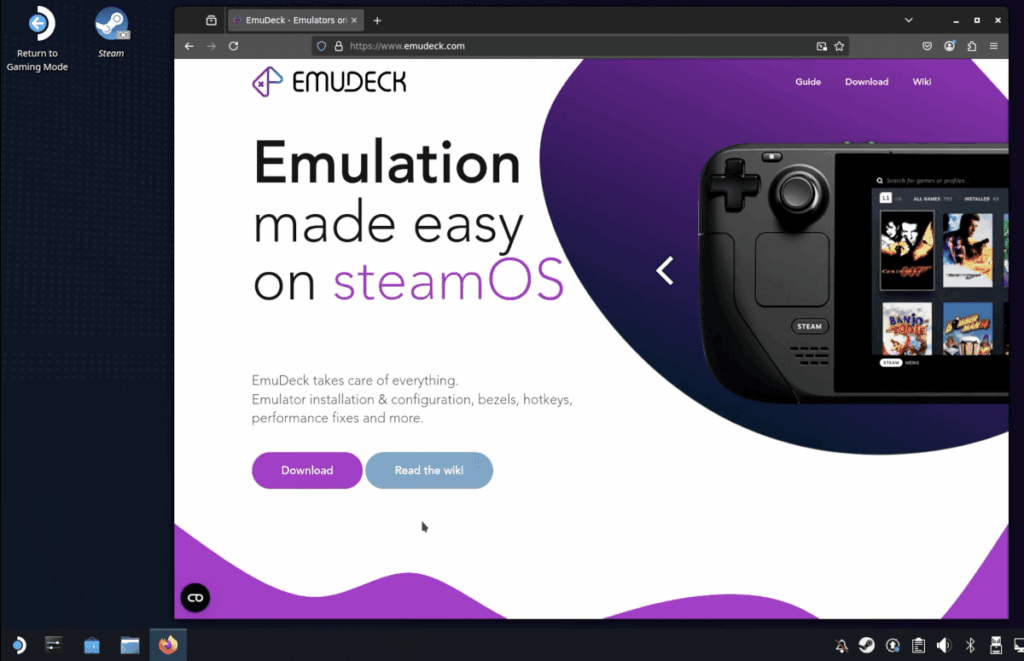
From firefox browser go to https://www.emudeck.com and download the SteamOS version
Pro Tip: Once downloaded, drag the file from your “Downloads” folder directly onto your Desktop; the script often fails to execute properly if run from the downloads folder.
Step 3: Install EmuDeck
After downloading:
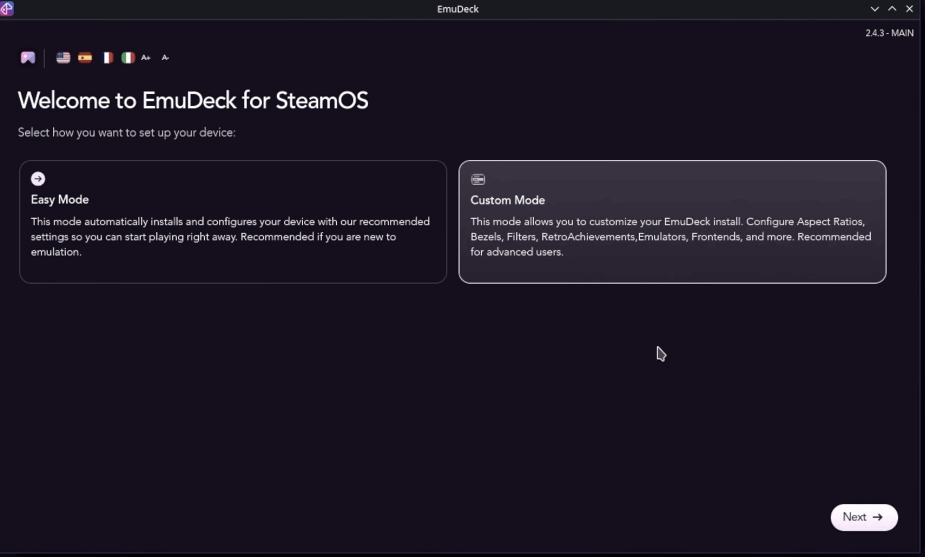
Double-click the installer icon on your desktop and choose Custom Mode. This mode is essential for beginners because it allows you to select your storage location and configure specific emulator settings that Easy Mode skips.
Pro Tip: If the installer appears to be stuck, look at your taskbar for a glowing yellow terminal icon. A hidden popup window is likely waiting for you to click “Continue” or “OK”.
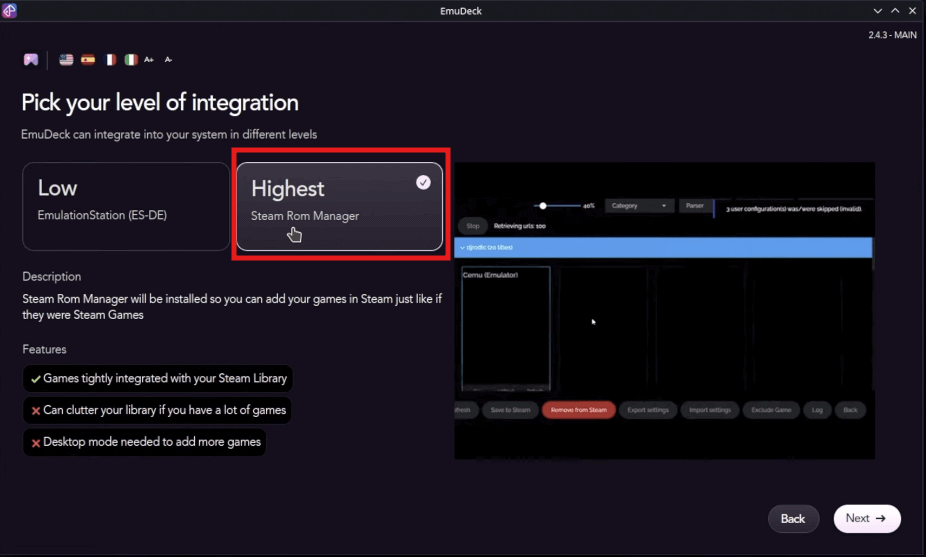
For users who want their retro library to feel like a native part of the SteamOS experience. Selecting this option during the custom setup process primarily enables the Steam ROM Manager to “inject” your games directly into your library.
Step 4: Select Emulators and Features
During installation, EmuDeck lets you choose which systems to install. Some of the most popular include:
NES / SNES
Game Boy / GBA / GBC
Sega Genesis / Dreamcast
PlayStation 1 / 2 / PSP
GameCube / Wii
DS / 3DS
Optional: PS3, Wii U, Switch (advanced configuration required)
You’ll also get options for:
- RetroAchievements integration
- Hotkeys and quick save/load settings
- Shaders, bezels, and aspect ratio management

From here select Emulators you want
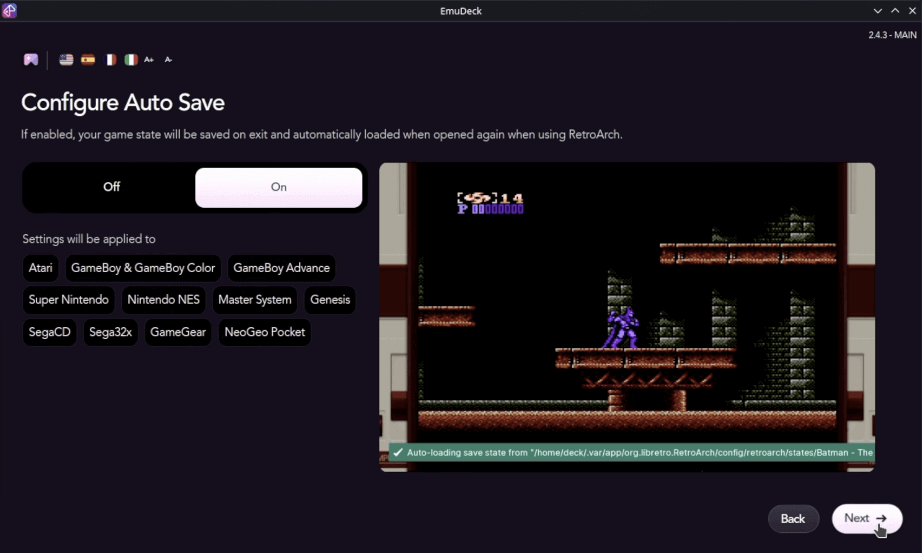
make sure its on for Auto save
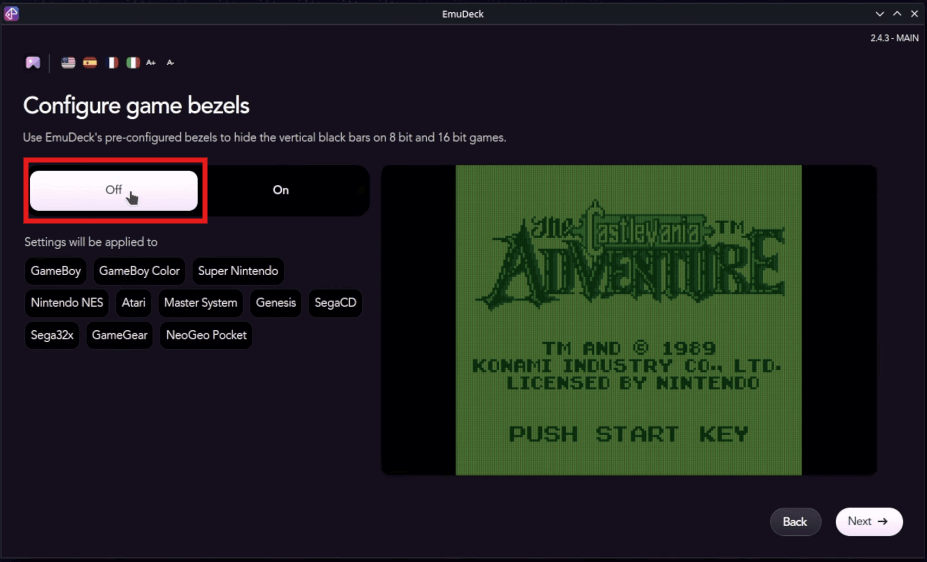
Select off in configure game bezels
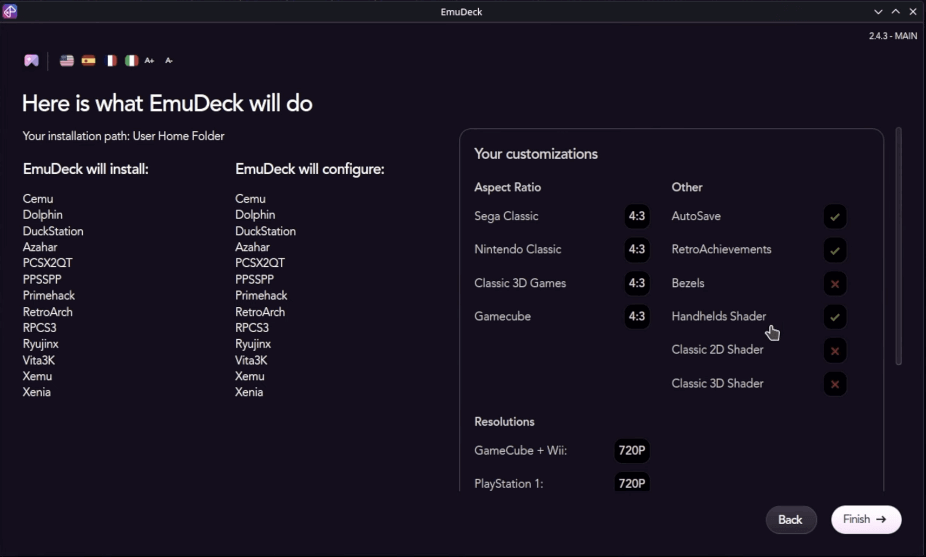
During the custom setup, you will be asked to choose aspect ratios and shaders. You can select 4:3 for an authentic retro feel or enable Widescreen Hacks for systems like GameCube and Dreamcast to fill the Steam Deck’s screen.
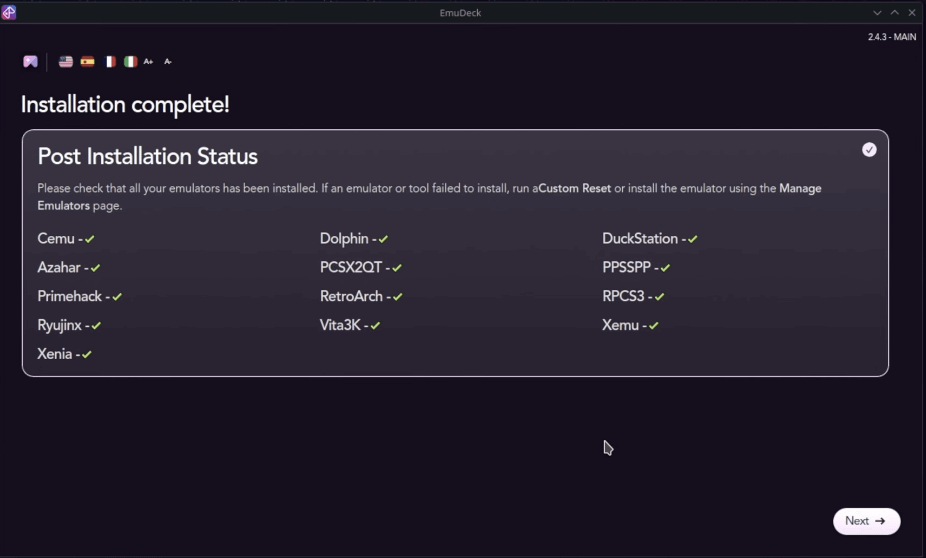
Congratulation! Now installation Complete.
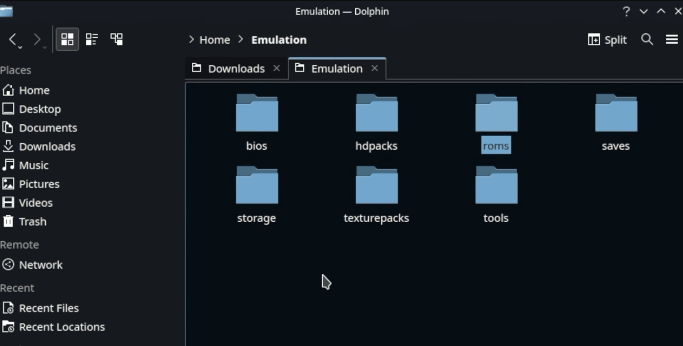
Step 5: Add Your ROMs and BIOS Files
1- ROM
Navigate to the emulation/roms folder created by EmuDeck. Drag and drop your game files into the folder that matches the console (e.g., put .gba files in the gba folder).
- Use a USB drive or SD card to move files from your PC.
- ROMs go into
/emulation/roms/
⚠️ you can know more about roms and bios from here
Pro Tip: Use the Emu Compressor tool within EmuDeck to convert large
.bin/.cueor.isofiles into.chdformat; this saves significant storage space while keeping games playable.
2- BIOS
consoles like PS2 and Switch require system BIOS or Firmware files to function. Open the emulation/bios folder on your storage drive and place your sourced files directly into the root of this folder.
BIOS files go into /emulation/bios/
Pro Tip: For PlayStation 1, the file must be named exactly SCPH1001.bin (case sensitive) and placed in the BIOS root or the
/duckstationfolder.
Detailed BIOS and Firmware Paths
| Console | Path in emulation/bios/ | Required Files/Notes |
| PlayStation 1 | Root or /duckstation | SCPH1001.bin |
| PlayStation 2 | Root | Multiple files (e.g., SCPH-70012) |
| Nintendo Switch | /yuzu/keys or /ryujinx/system | prod.keys and Firmware |
| Sega CD | Root | Region-specific files (US, JP, EU) |
| Dreamcast | /dc | dc_boot.bin |
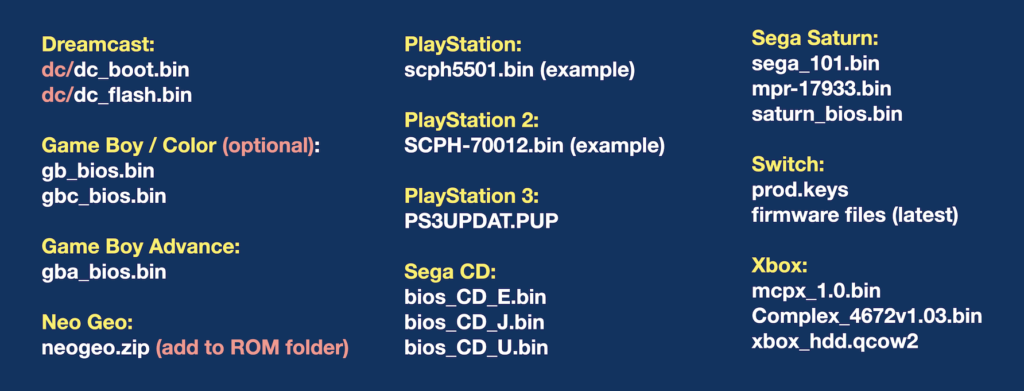
you can find this files by searching Here
Step 6: Add Games to Steam Using Steam ROM Manager
Once ROMs and BIOS are in place, Launch Steam ROM Manager from within EmuDeck.

Click Reset Configuration the first time you use it to ensure the paths are correct, then click Parse to find your games and Save to Steam to add them to your gaming mode library.


Pro Tip: If you have thousands of games, use the Exclude Games feature to only add your favorites to the Steam library; otherwise, your pc handheld steam interface may slow down.
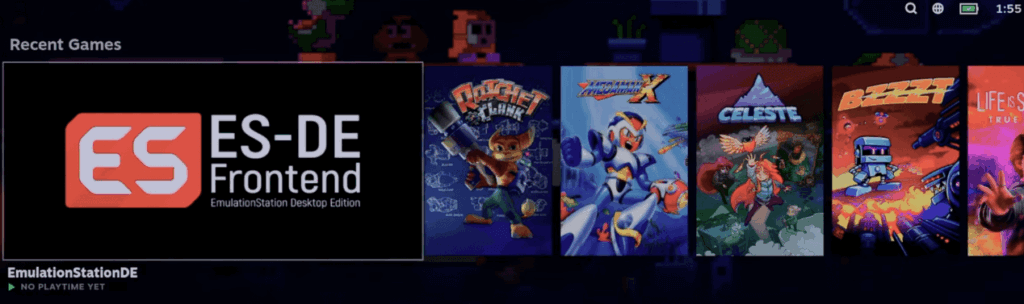
Now install Emulation Station Desktop Edition (ES-DE)
While emudeck for steam deck allows you to inject games directly into your Steam library, Emulation Station acts as a “system within a system,” which is highly beneficial for specific reasons.
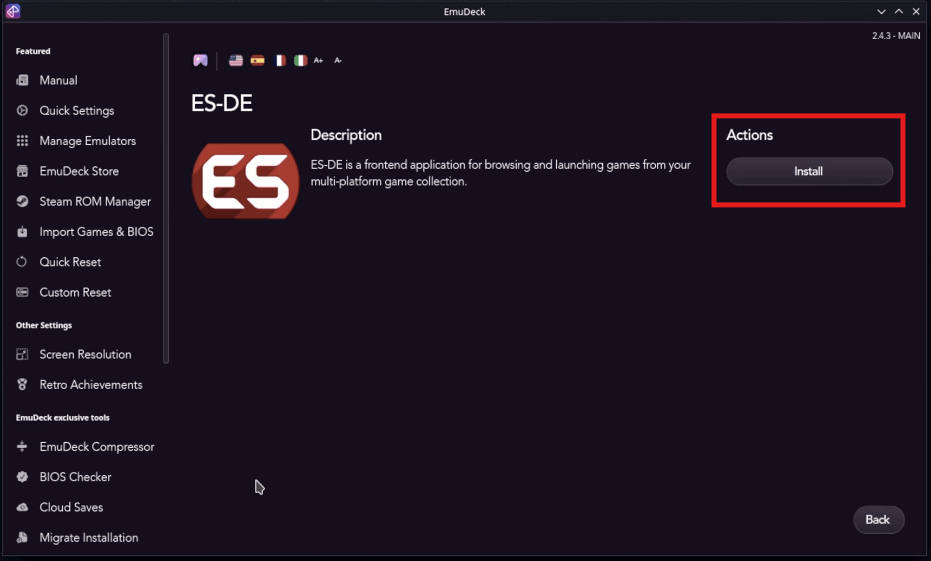
you can install ES-DE manually by opening EmuDeck, going to Manage Emulators, scrolling to Emulation Station, and clicking Install.

• Return to Gaming Mode and launch the Emulation Station app from your library.
Step 7: Launching Games and Using Emulation Station
Now you can launch games in one of two ways:
- Directly through SteamOS Gaming Mode
- Via Emulation Station Desktop Edition (ES-DE) for a beautiful, console-like interface
ES-DE is great for big collections and shows your library in a clean grid or list format with cover art, ratings, and system filtering.


Bonus Features in EmuDeck for Steam Deck
Here are some powerful tools included in the 2025 version of EmuDeck:
- BIOS Checker – Confirms you’ve installed essential BIOS files
- Game Compressor – Shrinks large ISO/ROMs to save space
- Storage Mover – Move ROMs between SD card and internal drive
- MUDI Plugin – Access emulator hotkeys directly in-game
- Updater Tool – Keeps everything current with one click
What’s New in 2026
• EmuVirtual (Symlinks): You can now use a “Simlink” to point your emulation folder to different locations without breaking the hardcoded paths in Steam.
• Cloud Sync: Available for Patreon supporters, this allows you to sync your save files across multiple portable pc gaming handheld devices.
• MUDI (EmuDecky): This plugin allows you to view a Hotkeys Cheat Sheet and change aspect ratios directly from the Steam Quick Access Menu while in-game.
• Homebrew Store: You can now download free, community-made retro games directly through the EmuDeck interface without searching the web.
Conclusion: Why EmuDeck for Steam Deck is a Must-Have
EmuDeck simplifies a once complex process into something accessible, clean, and incredibly satisfying. Whether you’re a veteran retro gamer or trying emulation for the first time, EmuDeck for Steam Deck offers a polished, all-in-one experience that feels like it was built for the device.
Useful links :
See what reviewers say about steam deck OLED